Saturday, January 30, 2010

After Soy'B

Over the Moon shop-front. Could only take this pic and then it was business-time! Ugh! Forgot to bring book-ends and the books kept falling over each other. But I managed to clear off half my cache! And my sister decided we should rename our second-hand books shop as S-books, or Satsugai Books!

Came back from Soy'B and tired! :)

Glad I met up with Snowfern and Asuka! Asuka is soooooooo (new nickname for her only Snowfern and myself know, hahaha)

Finally there's time to concentrate on the loads of sweets bases I have been making for the Etsy shop opening -- as well as a set of foods for my newly adopted children! (Chun's babies) as well as Lian's Nuah Korkor!

Sachi-san, if you are reading this blog again, I will reply your email soon. I have been very busy! :(
Sachi-san, 最近とても忙しいです。私はすぐにメールの返信されます! >.<

Saturday, January 23, 2010

Strawberries and Cream

I usually spend the early part of the day or the later part of the night making creams and frosting in little sauce boxes used by sushi stores for their soy sauce. The colors for all the creams are mixed by hand and mostly, again eye-balled with a reference pic somewhere. It gets hard sometimes when the color you want isn't there!

So anyway.

Here's the row of pink and red frosting done for the Valentine's Day project.


(You can also see how tight my workspace is, I really need to buy that trolley we were discussing this morning too! (Asuka has one *jealous*) Colors are based from Folkart Acrylics, just about the cheapest bottles of A-paints I can find here and with the largest range.

Recently there has been a strawberry craze by someone, and I ended up putting together some last night too. You can see a peep of them in the same photograph on top.


The strawberry family. Once I varnish these and seal, they get a nice little dip. I'll take more photographs of that later!

Weekend. Time to head out for some retail therapy and run errands. :)

Wednesday, January 20, 2010

Packing the Goods

Today was a long day at work. But I managed to get a bit of time to fix the magnet strips to the rest of the tartlet bases. The flexible magnet strip can be found at Daiso Singapore for $2 a piece. And the beauty of it is it has grid lines for you to follow so you will not cut out of line or shape. These are around the size of a SG50c coin.


I'm not sure how much the people are going to sell it for. Since everything's donated, I'll just not think about it! The bottom is painted and varnished balsa-wood, the kind that is used to make model airplanes. It is light enough with air-dry clay so a magnet strip works well. A bulky round magnet behind would just make the whole piece look rough :(


Bagged and packed! :)

I tossed my crappy tea-cups and my equally crappish macaroons onto the plates and fixed them to the balsa-serving boards to be made into magnets. I have no idea if these will sell but since there's only four of them, at least the disappointment won't be so terrible!


Packed and bagged too! Just no picture for now. So the bazaar items have been cleared. *whoosh* Now to start looking at the list of things to do for Valentine's Day. :)

Sunday, January 17, 2010

A New Toy and Bazaar Stuff


Eversince I got the Padico Color Chart and Clayscale, I wanted to try it bad -- so since weekend is clay crafting weekend and produce buying, so I headed over to LC and got the set of Grace Colored Clay just specially for this. So, good-bye to paint-stained hands for a bit.

I am done with the cookie (magnet) bars for the March bazaar. Just wondering if they would hold out on the colors before March. No profits will be made though, I'll be donating these and the rest of the fruit tart magnets as well to charity. (That should get me some good karma for this year! tee-hee)


The bar is 5cm in length, the cookies are roughly 2cm in width, probably on a 1:6 scale. Three sit on a painted balsa wood bar which is also varnished - so you don't have to worry about wood rot!


The strip magnet has adhesive on it already. It was cut from a larger piece using scissors. All the bars have strip magnets. I'm definitely thinking I need to put a warning on these that they aren't too strong magnets and shouldn't be used to pinning up too heavy a piece of paper. The fruit tartlet ones should be having the stronger magnets once I get them next week.


Bagged and packed!

Saturday, January 16, 2010

My First Macaroons

I've finished over the week, the parts needed for assembling mini-sweets themed stationery items for a charity bazaar in early March (I think). The variety includes a bunch of cookies, frosted, jam-med; two kinds of tarts; blueberry and strawberry with cream, and a couple of macaroons which was supposed to be a mistake but it worked anyway.

 They became my first macaroons. *hah*


They were supposed to be pink frosting for another batch of five cookies and it ended up that the light red Grace I saved dried to a partially-plastic consistency. So I added more wet Grace, mushed it up, added some more pink and made macaroons. They still look very rough-y around the edges, probably the fact being my poking tool isn't thin enough and the clay was hardening by the second! I'm still not good with sizes yet and most of the macaroons are eyeballed -- so most of them range around 1cm in width.

I will attempt another round of macaroons again when I pop out a new batch of Grace. :)


These tarts are not to doll-house sizes. They look slightly exaggerated due to the fact they are going to be stationery products -- like what I mentioned above. I am assuming many people would buy something that looks pretty and is useful, rather than it just looks pretty; unless they are a miniature collector.

Time to head out since it's Saturday, and go about the craft shops to get some produce. :)~

Friday, January 15, 2010

Props, Boxes and Tin-Cans

As I continue along my clay crafting journey, I became, in fact, very interested in the peripherals that make clay food art "come to live", or so-called the props to be used - ceramics, baskets, cups, plates, cutlery, serving trays -- Oh you name it and it's all out there.
It led me to scouring out a few deputy purchasers to help me get some of these goods since I have been munching my way through a lot of Japanese sites on Rakuten, Japan Auctions and non-affliated places within Japan itself and Hong Kong. (The latter site inflated its prices very badly and tries to explain why its prices are so high because every other site's products are 'pirated' -- Made me laugh!)

I wouldn't be surprised if I end up being a props supplier rather than a clay food artist. ^0^ Psst, I better not be.

Happy Note of the Day

Emailed Sachi-san today. Oh she replied! Said she was extremely happy to get an 'overseas email' and it was her first time getting it. She used some interesting techniques in her food artistry which I am rather keen to understand how she did it.

Anyway, Sachi-san's website : http://sachi2007.web.fc2.com/ and her blog http://lighthouse.blog.so-net.ne.jp/

Weekend. Finally! Time to finish up the goods I promised for a charity bazaar.

Tuesday, January 12, 2010

Present from Floree

Received my package from Floree today, courtesy of a commission seller. I'm still looking for a cheaper handler; this one's kind of expensive but its very reliable.

Was very pleased to find a tiny sachet attached to my items, and on it; labelled "Present"! I love free gifts *cackle*


It's fake coconut powder! It can't pass off as white chocolate shavings because of the white-ness of it. So I'll have to figure out some foods that uses coconut powder. I never knew Floree carried such products. Coconut is definitely not Japanese!

Monday, January 11, 2010

Weekend Prep


I spent the Sunday working on prep items eventually for the cookies and tart bases that I have made on Friday night. Since air-dry clay requires, *cough* air-drying -- I have to wait for one to two days of open air drying  before the creations are dry enough to be painted.


I didn't bother to paint the larger strawberries I made, those I will do over the week to make chocolate-dipped strawberries. Instead I painted the smaller ones that will go into the tartlettes. Those green things you see in the blurred background are .... slices of kiwi fruit! But I think I made them a tad too thick, they look odd after painting. *sigh*

Apart from strawberries, I made a mountain of blueberries. Not exactly mountain, but you get the idea :


The other tart decoration I have made are gold-flecked chocolate slices. Rolled out Grace Clay dries into a consistency like flexible plastic and it cuts quite easily too with a sharp art cutter.


 This slab of chocolate was dried out on a plastic sheet the night before. I use a stencil brush to dab gold acrylic over lightly.


Here's the result. Let the paint dry; usually it is quick and then you can start cutting into squares, circles, ovals, whatever pleases you.

As for the cookies that I have showed you in the other post on Wood Formo, I have painted them - these will dry overnight again so they reach maximum shrinkage, and then decorated.


Saturday, January 9, 2010

Article on Ms Vickie Lee, owner of Craft It All

Since work has taken up the whole week and I have forgotten my mandate to at least blog something every day or every two days, I am trying to make up for it. (Looking at my list of what I have to write about - *coughh*)

I have always been an admirer of entrepreneurs and people who dare take the risk for their passion and do something right out of it. I mean I have tried to dabble into the world of entrepreneurship for, say eh, 8 years or more? But most of the projects never lasted too long well, maybe past a year or three years or so. I blame my poor attention level for it.

Plus, I hold a full-time job that chucks a partial amount of my salary into CPF. And the baseline being if you have that CPF, you can't be engaging yourself in any other self-employment such as owning a shop, owning a registered business or anything else. But you're fine with just hobbies.

But anyway - enough blabbering about my own situation. Remember the shop at Liang Court where I found the Hearty-Soft? The owner, Vickie Lee, actually had an article written about her in Jobs Recruited, so to share, go to this link - Crafting it Herself 

I have to thank her for bringing in all that clay from Japan, else I would never had gotten started. :)

For the Mold Enthusiast - Floree Japan

Although clay molds are perhaps seen as a naughty short-cut in the crafting community, I do like my molds if there's a need to do mass-crafting. Molds are like time-savers to air-dry clay users, like canes are to polymer clay users I guess! :D

Since I am not a fan of mixing sillcones to do my own molds, I would try to get the air dry clay / deco craft molds made by Floree Japan, which sadly has become the objects of boot-legging by many Etsy sellers (Some of whom I have mistakenly bought from.)


If you search Etsy's with the term 'clay mold', you'll get an array of blue-silicon copycat molds, fake Floree molds priced anywhere from $5 to $10 USD and the real Floree molds. So far, I have found only two sellers on Etsy selling the real thing which they priced at $15-$19+ USD, the former shipping these molds directly from Japan itself. You can also go through a commission seller to purchase your molds off Floree's Yahoo-auction website and have them shipped to you. Floree molds cost 980 yen per mold (around 10USD), and sometimes there is special discounts. I got my first two Florees from Tokyu Hands in Shibuya, Japan last year.

The fake ones are labelled "f-style" on the side and do not have Floree's distinctive watermark behind, which bears the mold's name and the website. The boot-leg ones are not sanded properly on the side, resulting in a lop-sided mold that cannot lie flat. Also, the inside of the molds are not shiny and smooth so clay takes a while to be removed from it. These probably go for like half the price of a real Floree mold.

Real Floree molds are made either from hard white silicon or black silicon. There's no difference between the two except you see stains on the white mold instead. The black will stain too, just that you can't see it. The front of each mold is stamped with the word 'floree'. Each mold has a distinctive watermark behind, like a company logo-thing - bearing the mold's name and Floree's website. The inside of the molds are smooth and shiny, clay comes out easily with these molds.

You can visit Floree's website to look at their products :

http://www.floree.jp/ - Main website, home
http://www.floree.jp/web1/ - Product Overview, first tab on the side-bar
http://store.shopping.yahoo.co.jp/floree/index.html - Floree's Yahoo Shopping Store, this is where you go if you want to buy molds and crafting materials, second tab
http://www.floree.jp/Les/ - Video Lessons on how to use Floree Molds to make deco and miniatures, third tab
http://www.floree.jp/gallery/index.html - Photograph Gallery of Products, fourth tab
http://ameblo.jp/floree/ - Floree Store Blog, fifth tab
http://www.floree.jp/kyoushi/index.html - Contact Lists, Japan only, sixth tab

Floree's website is very exciting to visit, do take a look when you are free. :)

Note : I am not putting up pictures of the molds that I have purchased but I would be glad to tell you who are the sellers for non-bootleg or bootleg Floree's  if you are interested in buying.

Friday, January 8, 2010

Graham Cookie Crust with Padico's Wood Formo

A french tart / graham cookie dough-like clay can usually be achieved by adding ground bits of dark brown spices, e.g. ground cloves, allspice or black pepper to a pre-colored clay. But with that comes the pungent spice-y scents too, that does not, sadly exist in real cookies and tart crusts!

You can get around that by using Wood Formo; a kind of air dry clay product by Padico. Wood Formo is usually used for model-crafting and sculpting. It is very very moist, so moist that it produces water vapor within the package when the weather gets a bit warmer. :\

Mix around 1/5 of Wood Formo with 2/5 of Grace Clay and 2/5 of Hearty Soft, white-base. If you want a darker brown clay, omit the hearty soft, and use 1/3 Wood Formo and 2/3 Grace. Wood Formo by itself dries up to look like, well, you guess it! So you wouldn't want a woody looking cookie or tart base.


Wood Formo + Grace Clay                                               


Wood Formo + Grace Clay + Hearty-Soft

It is still very sticky to work with, and most likely you will end up getting strands of rebellious clay all over your fingers. Once you get the consistency and color you want, "ball" the clay into your palm and use your palms to fold and round it up. Avoid touching your clay-ed fingers to it and after which just wash and scrub all the residue on your fingers. It's best to allow the lump to stand outside for a while to let the moisture dry off so its workable - but not too long!


 A range of cookies made from the mixed Wood Formo clay. Let dry for a day or overnight on plastic sheets. Make sure you flip the cookies to let the bottom dry as well. Moisture tends to collect a lot at the bottom of these. I will probably have a post on coloring these once they have dried. :)


Monday, January 4, 2010

Attempting Cookies 101

I was browsing through another new Japanese food-claycraft site and totally racked my brains trying to think how these people managed to make cookies in a soft baked vanilla like color.


I had a lump of left-over Grace clay and decided to cut some mini-cookies from them.

Ran a old toothbrush over the top of these cookies for cookie texture. And after they dried, I dabbed them with a wash of orange acrylic; tangerine to be exact. Once that dried, it was decorating and varnishing.

Still trying to figure what to do with them since they are just test pieces, but it turned out pretty well, I say!


I dug out some clear acrylic squares and tried to see if I can get a shot of these cookies in some sort of better arrangement. :) Got these squares from a scrapbooking store. It was like $26 SGD for a pack of maybe 30 different sizes of squares and rectangles.

Pastry Magnets - Delicious?

 I thought assembling the cookies without a reference would be a cinch since I watch that many cooking programmes. But it came to really getting down at it, I was at a loss of imagination! And well they didn't turn out too badly, I suppose.


I topped the cookie base with Grace Resin Cream Clay. Managed to stuff a bit into a pastry bag and used a plastic nozzle to pipe it all around the base. I couldn't take pictures of the process since my hands were so sticky with the cream clay. It sticks so terribly; think of it as very melted marshmallow that will not set! I wasn't sure about whether it was the temperature and humidity of that day, the cream clay was so sticky that I could not form proper cream blobs. So I gave up and just whirled in the cream onto every cookie base using an orange stick.

(Makes mental note to try in an air-conditioned room next time. *sigh*)

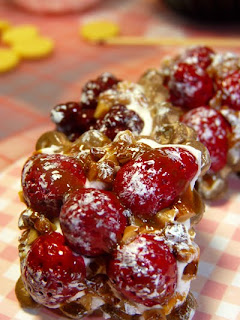
Raspberries, chopped nuts and strawberries went on the cream-topped cookie bases and after they dried, I dribbled each with some window-glass paint, that dried up to form caramel and chocolate drizzles.

Once that's dried, I varnished it - and slapped some round stick-on magnets to their backs.


Now they are on the metal cupboard at my workplace, looking pretty and holding up documents! ^^

NB : Plaid's Gallery Glass window color in Amber makes very rich caramel drizzles. You need to let it dry for a day and you'll be rewarded with this gleaming toffee caramel glaze.

Saturday, January 2, 2010

Berries and Almonds

Worked with Grace Clay for the first time. It has a lovely, pale-white translucent color and very easy on the hands to mold until -- you add acrylic colors to it; then it turns mushy and almost to the texture of melted marshmallow. Terrible to mix but if you continue at it, you will be rewarded with wonderful results. Then you have to work quickly as Grace Clay tends towards fast loss of moisture and end up having a texture of drying paper clay. Made a couple of raspberries and almonds using Grace; as well as strawberry leaves and slices.


I managed to finish up all the rest of the Hearty Soft clay, the last bit of tea-brown was used to make tiny eclairs. I used a mold from a used "Panadol" pack to press out the eclairs and texture it.

Next to figure out how to arrange all the fruits and nuts onto the cookies. I will probably be making a few chocolate slices too.