Saturday, April 6, 2013

Apricot Tarts and Mango Blueberry Pastry

In my excitement and rush to get all these packed up, I honestly forgot to take all the process making pictures of these items for a doll event in Malaysia. Since I hold a full-time job, crafting is very much limited to the rare (and free) weekend I have and some of the evenings and nights. I hate working at night under the glare of the lamp - maybe its time to switch to a better lamp. :(

One of the items made for the event are these apricot tarts and mango-blueberry pastry.


Kind of standard fare! First, the prototypes are made using Tamiya Epoxy Putty. I used some small plastic slides to mold the putty on it and shape into two 1:6 scale pastry cases - a round case and a square case.
You can purchase Tamiya Epoxy Putty (Quick Type) at any local Tamiya goods store or get it online at the Hobby Search shop at http://www.1999.co.jp/eng/ . This was the same method I learnt from Tanaka Tomo's book (better known as Nunu's House) which he also used the same product to mold prototypes for 1:12 items. The epoxy dries after 3-4 hours - so you have some time to cut and sculpt your prototype. Use a plastic slide to mold your epoxy on as its extremely sticky on skin and hard to mold between fingers. Use a metal pick and penknife to pick and pull the putty and roughen up the top and sides.


Mold a ball of mixed silicone putty over the dried prototype. After around 10 minutes, the silicone putty (in pale blue) should be hardened. You can pop them off the prototype easily - if you are worried that your silicone putty may stick to your prototype,  put baby oil or mold release oil over the prototype before molding the silicone over it. Make sure you have enough silicone putty to cover - sometimes too thin a layer might tear it.

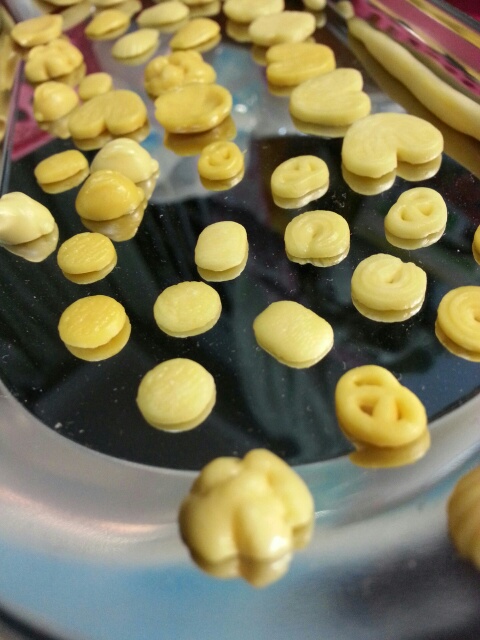
I used Resix clay mixed with ochre clay for the pastry cases. You can see them in the front of the photograph below after they are colored with pressed pastels from the Tamiya Baking Master set. Since I was in a rush to complete it - I didn't take many process pictures. Here's the finished product! Each pastry measures 1cm by 1cm, and suitable as a pastry or tart for a YoSD / 1:6 ball-jointed doll or a mini-tart for larger dolls.


Apart from tarts, the packages sent along with my friend to Malaysia included tiny cakes and doughnuts and the view of my messy workspace while packing away :\
 

In addition, I folded up Pocky boxes and Kit-Kat in different sizes. And my MSD Juri looks happy with them (too bad, girl - these are gifts for another friend!). 

The end for now! Juri says have a great weekend ahead. :)


Thursday, March 7, 2013

About Decorina - How-Tos for Deco Sweets

Decorina, a sweets deco school based on Tokyo has set up a section in their website that pretty much tells in photographs and written explanations about how to make common deco sweets objects. Scale these down and you can get your 1:6, 1:12 items easily too. (The scaler I use is found in the links on the right side of this webpage - there are also hobby scalers on Andriod/iPhone apps if you are a phone-dependent, scale-blind person like I am)

The website doesn't come in English but if you use a translator like Google translator, you can easily make out what are the headings and somewhat, the explanations, albeit broken English.

Decorina will cover basics like how to use whipped cream, how to make and color cookies, macaroons etc. It's relatively easy to follow - of course - some people who are used to looking at fantastic work done by the more prominent and established deco artists like Kisen Rieka (http://ameblo.jp/kisenerika/), Yamada Kei (Milky Ribbon http://blog.goo.ne.jp/milkyribbon) and Sekiguchi Mayu (Pastel Sweets http://love-ribon.seesaa.net/) may blink a few at the rather rough level of artistry shown in Decorina's tutorials. But, the emphasis is always the basics are important and by getting the foundation methods correct, you can modify, idealize, imagine and re-create your own with a few months' of focused practice.

For example : Macaroon Tutorial - http://www.life-d-eco.jp/recipe-macaroon-dough
For example : A way to mix clay colors - http://www.life-d-eco.jp/recipe-colored-clay

For a full lists of all the tutorials
http://www.life-d-eco.jp/sweets-deco-recipe/
(scroll down to click on the icons of the items you want to learn)

Have fun making your own deco sweets! :)

Saturday, February 16, 2013

Working the leftovers!

Finally cleaned up my brushes today and separated my findings from the ribbons in the craft cupboard. Later, I was debating on the viability of some of the one year old clay in the claybox. It looked like some were still usable - like Grace and Hearty (which I liberally mummified with tape and more tape a year ago) and such - though what was left of the lump of Cosmos hardened even within its packaging.


Pulled out one of the older ochre Grace clay stick to mix. There was no mixing chart for Grace on the new Padico clayscale I got from BFJ (http://www.bestfromjapan.com/moreinfo.cfm/users/mylist.cfm?product_id=867&actioncode=add) so I just went along with a rough gauge. (Makes me all more determined to get a set of Modena colours just to play - but I do have to finish up all the year-old clay first). Love the pick that comes with the new version - it has a sharp tip and a flattened end; extremely useful!


The menu this evening was anything small and baked and a batch of macarons. What more could you ask out of year old clay! These should be dry overnight in cool air-conditioning for coloring tomorrow.
 
Decided to try the clay release master from Tamiya on my molds - you can just use baby oil on a budget. There is no marked difference except you get a bonus facial on your fingers since you would be getting baby oil on your skin. The Tamiya version comes in a nail polish sized bottle with its own brush. One small difference was the longer time the oil stayed in the mold. With the Padico and brandless ones,  the oils dry up quickly. This retails locally for $6 a piece. If your local Tamiya supplier do not have this, visit Stargex at Paya Lebar if you're in Singapore and you should be able to find lots of products from the Tamiya Decoration Series as well as this item at the store.
 
Since my workspace has shrunk to half a table after some living arrangement changes, I have swapped to using a mini standing magnifying glass instead. But its still tiring to look at small stuff when it gets later into the night. I'm still trying to work on my scales (though most of the time, it ended up being a "feeling" thing aka it does not feel right). Maybe it's time to find a niche area that does not demand too much of scaling ._.
 

Monday, February 11, 2013

Hiatus is Over!

After a very long hiatus (lots of movement and changes in real life) I am back informally to my crafting hobby again and feeling great about it.
 
I have re-arranged a lot of materials and thrown away more sadly - since clay do dry up into unusable chunks after a whole year. But nevertheless I do have some new starting packs to work with.
Here is a sneak peek at the newly arranged craft drawers!