Saturday, February 27, 2010

Cream Clay Piping Practice and Icing Tips

Did a little piping practice today. I had failed a lot previously with piping when I was using plastic nozzles. I wasn't very good either with the sillicon deco tube either -- plastic nozzles were hard to handle. With that in mind, I headed off to our local baking supplies shop and grabbed the tiniest Wilton icing tips available, which are coincidentally metal.

Miniature piping bags can be hand-made using small plastic sachets and curling a stretch of "foil teeth" from a aluminium foil or plastic wrap box. Yoyo Studio's tutorial is one of the more well-known ones to teach clay cream piping.

The difference between hand-made nozzles for miniatures and icing tips is simply -- clay wastage. Icing tips are larger and you will have a bit of clay left over after finishing whatever you have in the bag. For the miniature foil nozzles, you reduce on clay wastage.

If you aren't that nit-picky on the clay and if you're fat-fingered like I am who can't curl a length of foil teeth for nuts, just stock up on Wilton icing tips with the smallest number for the series.


These were done with a Wilton Open Star Tip 13 and a normal plastic piping bag which I cut into half since I didn't need such a big bag. Make sure you tape the plastic bag to your icing tip as it can move and mess up your piping.  You probably can get a vague idea of the tip-size with this link. I used pure Grace Soft White Cream Clay. If you are not sure how to handle a piping-bag, Google turns up a few good tutorials like 1M Swirl Cupcake Icing tutorial one on Wilton's own site.

You can also make a soft cream-like clay that can be piped easily by soaking pieces of air-dry clay in water along with talcum powder. Use enough water to soften the clay to a mushy texture but don't over-soak it else you will take a very long time to get it back to a drier state. Use acrylic colors to mix in if you want to get an opaque feel to your prepared cream.


More pictures of what I did with the rest of the cream clay. I worked with a few methods of swirling on the cupcakes made a few days ago.


Piped some cream into a few raw-looking tartlet bases. The metal tip makes it very easy to use. If you have been attempting with plastic icing tips, the tip will not be able to 'cut' and release the clay well. The larger piping bag is easy to hold and use for people with a not too steady grip. :)

Tuesday, February 23, 2010

The Madness about the Swan Cream Puff

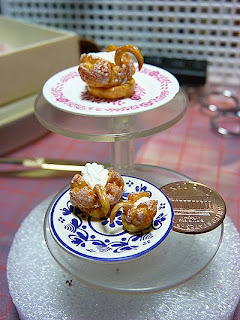
I joined in Snowfern and Asuka's madness with the swan cream puffs and tried to make my own. Everything was quite simple to do and fix until it came to (1) coloring and (2) making the heads of the swans.

(1) being that my cream puff bases kept falling into the coloring pit of horror and I ended up with a few that can't be used. :(

(2) the heads are really tough to make! I think my fingers were sprained by the time I was trying to twist the heads into an S-shape. Finally I gave up and just made a C. So the swans look like ducks instead of swans. :o

Anyway :


Puff-bases from vanilla-based air dry clay. This is pure Grace clay. I simply refuse to use Hearty-Soft since it does not agree with the molds I use. This time, instead of the usual opaque acrylics I use, I colored using a mixture of water varnish for wood surfaces and Tamiya clear acrylics.


They look a little like Japanese soy-sauce crackers on second look - but I am still pleased with the results. These are not varnished yet, so after varnishing, they would be less soy-sauce shiny? :0


Finally got these three assembled after like 30 minutes of struggling with the cream and wings. I had to glue the wings of the smallest one to the cream, else it kept falling off. Then I realized I have a lot more swans to assemble... so I think I'll leave those to tomorrow.


View from the top - the larger swan on the blue plate appears to have an elongated cream butt-tail, now that I look closer at it.

My largest swan - you can see the 'C' neck instead of the 'S' neck.


With a penny for scale for you to gauge the size of these three. :)

And finally, my messy work-top with lots more puffs to assemble.


Till the next crazy CBC challenge! Onwards, girls!

PS: Have a look at Asuka's and Snowfern's swans at their blogs.

Friday, February 19, 2010

Miniature Pastry Boxes

I was debating quite hard on the packaging material for my completed French sweets and was not too happy with just plain cellophane wrapping. I wanted pastry boxes in miniature so I could stuff them all with these sweets, and most importantly, it will look good!

It took me literally a week or so to source out all the bases of the boxes I wanted to make and have them saved up. I found a ton of really nice templates from Mirkwood Designs (a very popular and well-known site, I was told) and Mel Stampz (another wonderful website for papercraft projects with loads of ideas and templates).

I sourced out photoshop brushes if you are using Adobe Photoshop like I do to design the boxes -- you can find tons of these just by googling for photoshop brushes.

These sheets are printed on 190gm2 matte photopaper and 170gm2 glossy photopaper. I use a Canon Pixma MP550 series photo-printer. Likewisely, you can also bring these to a print-shop or Kinkos if you do not own a photo-printer at home.


I used a variety of pens and scissors to cut out the box itself . Since it is that small, cuticle scissors does the trick around the corners and a very sharp, small-nibbed craft knife is recommended for this. A pair of clean pinchers does the trick of pulling away stray bits of paper too small for your fingers to nip.


I scored the box's folding guide-lines using my craft-knife. The craft-pen (in blue) has a pretty good side for scoring, and it is smooth plastic too.


All scored and ready to be glued and folded.


Use tacky glue above everything else since your usual glue-stick or runny glue is not going to work here - the project will fall apart if you used the former, and the latter will just wetten all the printing (which, beware, is not waterproof)


And all glued up. Hold onto it for a few moments to let the glue semi-dry.


And it's ready to hold some of the sweets! Not exactly the best photo since I didn't get this set up in my mini photo-studio but you get the idea.

Time to fold more boxes! :)

Sunday, February 14, 2010

Liquid Sukerukun Clay, Part Deux

Snowfern blogged about Over the Silver Moon on her blog and it made me blush a good bit from the way she has written about my endeavours. Thank you, friend! <3

Now onwards to the Liquid Sukerukun experiments.

From my earlier post about the liquid sukerukun clay experiments, I was still rather worried that I got scammed into buying a pot of white craft glue. So I kept a constant watch over these donut babies and here they are on the second day after getting frosted. I have sealed each one with Folkart's Satin glaze and there's no super crinkly shrinkage like what white craft glue would do.


I am going to try the liquid Sukerukun with watercolors and oil paints next to see what other kind of effects it will bring since the liquid dries to a transcluent and almost transparent finish if you do it thinly. This is infact quite exciting! :)


* I have decided to drop in a small tag for experiments and once I'm back from the whole Chinese New Year work-out, time to spruce up and clean the blog a little.

Happy Chinese New Year everyone and Happy Valentine's Day! (A little attempt by me below to make tiny pink-frosted heart cookies with some funky decoration job on it... >_<)


Wednesday, February 10, 2010

Liquid Sukerukun and Coating Donuts


Guess what the postman brought today from A-Smart Shop. Texture sheets, two bottles of mold putty, liquid sukerukun and the A&B epoxy.

The first thing I opened was the liquid sukerukun. On it the Japanese label reads "Liquid Sukerukun" and "Water-Soluble". Behind is a wall of text about how it dries to a transparent/lucent finish etc etc. The inside of the whole bottle smelt suspiciously like white glue and behaved it like too.


Did I just pay like more than $10USD for a bottle of white glue? It sure does look like it. But the shop classified it under Air-Dry Clay. I dragged a couple of unmixed sukeru-liquid over a test piece of cookie. It dried and looked like a strip of transparent dried glue. The next thing I did was to mix acrylic paint into some of the liquid - about a small spoonful of Americana's French Vanilla.


It was very liquid-y at first, really like white glue. After exposure to air, it started gaining a bit more texture and form, and felt heavier to work with. But it does not lose its ''creaminess" and dry up like air-dry clay mixed with water.


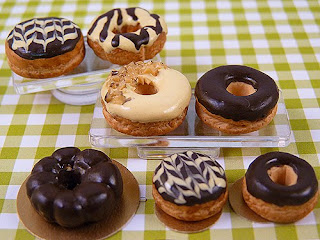
Which is a horror to work with each time. I have to keep all my frosting trays well-watered and stashed away in plastic bags else it is back to square one to soak and wetten them. Maybe this Suke-ru-liquid thing is the solution to air-dry clay frosting, then again the liquid is not cheap. I ended up using my experiment to glaze some donuts. So now I have a black and white donut collection :


Tuesday, February 9, 2010

Photo in a Studio

It so happens that I take a lot of shots at night of works in progress and relying on just my overhead lamp gives every photo I take a horrible edge-y glare. So I purchased a photo in a studio set using some of the birthday money hubby sent over -- well paid for a bit of it, so that I can dump a bit of investment into macro-photography. Costs around $100+ SGD with shipping thrown in.


I set it on top of the large cabinet perpendicular to the study wall. The lamps get very hot every time I did at least a 10 minutes plus shot - and I nearly fried a finger because I touched the casing near the bulb. I am stll kind of newbish at setting up the lighting and whatnot, but the nub shot I took of some of my miniatures tonight turned out alright :


Very-large madeleines, 2cm in length and a bowl of small strawberries.

Wednesday, February 3, 2010

ありがとう Sachi-さん

I visited Sachi-san's blog today and was pleased to see a wee section of her blog entry dedicated to Over the Silver Moon. <3

Thank you very much, Sachi for the link exchange. :)

Do pop by Sachi-san's blog, she's so detailed at making 1:12 miniatures and some of her entries provide a fair bit of tutorial as to doing other miniature products than just with clay.
リンクさせてありがとう Sachi-さん

Tuesday, February 2, 2010

February's Work in Progress

This month, I am still working on a large array of French-style sweets and pastries. The amount of work put in to these tiny things is so immense. Apart from just working clay alone, it hit me that miniature making is not just about clay. I guess I was a tad too naive and did not realize that this hobby would carve a huge hole in the melon for me. Here's a brief scan of what I have so far :


Anyway, I did chocolate-stripped strawberries in dark and white chocolate and after finishing with it, I realized that the bag I used for piping had too big a hole and so it made huge flat stripes instead of the frilly thin ones I would had liked.


Looks more like zebra-berry, than something romantic. *sigh*


The choux cream puffs are also part of the selection of simple French sweets in my list to do for this month. Soon to be assembled and dusted with sugar and chocolate.

Guess what came in the mail

The porcelain dinnerware set I bidded for in ebay!

I went to pick up from the P.O. today finally, not too sure what items were delivered to my apartment last week and no one was around to sign for it.


They came protected in bubble-wrap and with another protective plastic cap on-top. All the plates are sitting in a fake-velvet casing. They look like a set of miniature Corning Ware XD.


The dinner set without the protective plastic cap.


I took out some of the plates for a close-up shot. My overhead lamp is kind of bright and it's taken at night so the quality might just look a little different.


Here's one of the round flower plates with some miniature cookies on it for scale. (My palm does look awfully wrinkled. :()

Anyway, I'm postively glad none of the items were broken after their long trip here!