Saturday, April 6, 2013

Apricot Tarts and Mango Blueberry Pastry

In my excitement and rush to get all these packed up, I honestly forgot to take all the process making pictures of these items for a doll event in Malaysia. Since I hold a full-time job, crafting is very much limited to the rare (and free) weekend I have and some of the evenings and nights. I hate working at night under the glare of the lamp - maybe its time to switch to a better lamp. :(

One of the items made for the event are these apricot tarts and mango-blueberry pastry.


Kind of standard fare! First, the prototypes are made using Tamiya Epoxy Putty. I used some small plastic slides to mold the putty on it and shape into two 1:6 scale pastry cases - a round case and a square case.
You can purchase Tamiya Epoxy Putty (Quick Type) at any local Tamiya goods store or get it online at the Hobby Search shop at http://www.1999.co.jp/eng/ . This was the same method I learnt from Tanaka Tomo's book (better known as Nunu's House) which he also used the same product to mold prototypes for 1:12 items. The epoxy dries after 3-4 hours - so you have some time to cut and sculpt your prototype. Use a plastic slide to mold your epoxy on as its extremely sticky on skin and hard to mold between fingers. Use a metal pick and penknife to pick and pull the putty and roughen up the top and sides.


Mold a ball of mixed silicone putty over the dried prototype. After around 10 minutes, the silicone putty (in pale blue) should be hardened. You can pop them off the prototype easily - if you are worried that your silicone putty may stick to your prototype,  put baby oil or mold release oil over the prototype before molding the silicone over it. Make sure you have enough silicone putty to cover - sometimes too thin a layer might tear it.

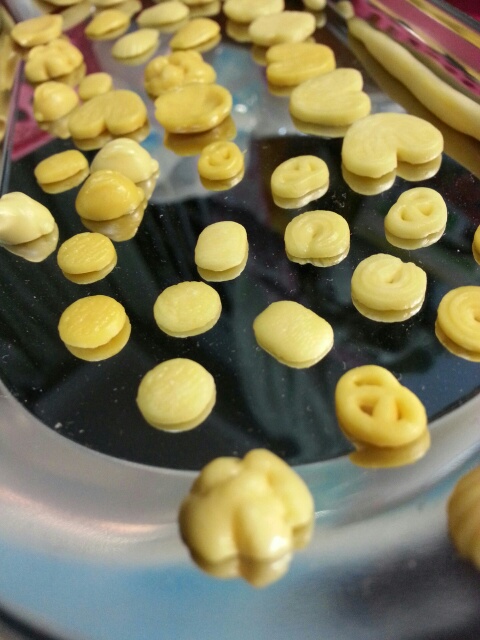
I used Resix clay mixed with ochre clay for the pastry cases. You can see them in the front of the photograph below after they are colored with pressed pastels from the Tamiya Baking Master set. Since I was in a rush to complete it - I didn't take many process pictures. Here's the finished product! Each pastry measures 1cm by 1cm, and suitable as a pastry or tart for a YoSD / 1:6 ball-jointed doll or a mini-tart for larger dolls.


Apart from tarts, the packages sent along with my friend to Malaysia included tiny cakes and doughnuts and the view of my messy workspace while packing away :\
 

In addition, I folded up Pocky boxes and Kit-Kat in different sizes. And my MSD Juri looks happy with them (too bad, girl - these are gifts for another friend!). 

The end for now! Juri says have a great weekend ahead. :)


Thursday, March 7, 2013

About Decorina - How-Tos for Deco Sweets

Decorina, a sweets deco school based on Tokyo has set up a section in their website that pretty much tells in photographs and written explanations about how to make common deco sweets objects. Scale these down and you can get your 1:6, 1:12 items easily too. (The scaler I use is found in the links on the right side of this webpage - there are also hobby scalers on Andriod/iPhone apps if you are a phone-dependent, scale-blind person like I am)

The website doesn't come in English but if you use a translator like Google translator, you can easily make out what are the headings and somewhat, the explanations, albeit broken English.

Decorina will cover basics like how to use whipped cream, how to make and color cookies, macaroons etc. It's relatively easy to follow - of course - some people who are used to looking at fantastic work done by the more prominent and established deco artists like Kisen Rieka (http://ameblo.jp/kisenerika/), Yamada Kei (Milky Ribbon http://blog.goo.ne.jp/milkyribbon) and Sekiguchi Mayu (Pastel Sweets http://love-ribon.seesaa.net/) may blink a few at the rather rough level of artistry shown in Decorina's tutorials. But, the emphasis is always the basics are important and by getting the foundation methods correct, you can modify, idealize, imagine and re-create your own with a few months' of focused practice.

For example : Macaroon Tutorial - http://www.life-d-eco.jp/recipe-macaroon-dough
For example : A way to mix clay colors - http://www.life-d-eco.jp/recipe-colored-clay

For a full lists of all the tutorials
http://www.life-d-eco.jp/sweets-deco-recipe/
(scroll down to click on the icons of the items you want to learn)

Have fun making your own deco sweets! :)

Saturday, February 16, 2013

Working the leftovers!

Finally cleaned up my brushes today and separated my findings from the ribbons in the craft cupboard. Later, I was debating on the viability of some of the one year old clay in the claybox. It looked like some were still usable - like Grace and Hearty (which I liberally mummified with tape and more tape a year ago) and such - though what was left of the lump of Cosmos hardened even within its packaging.


Pulled out one of the older ochre Grace clay stick to mix. There was no mixing chart for Grace on the new Padico clayscale I got from BFJ (http://www.bestfromjapan.com/moreinfo.cfm/users/mylist.cfm?product_id=867&actioncode=add) so I just went along with a rough gauge. (Makes me all more determined to get a set of Modena colours just to play - but I do have to finish up all the year-old clay first). Love the pick that comes with the new version - it has a sharp tip and a flattened end; extremely useful!


The menu this evening was anything small and baked and a batch of macarons. What more could you ask out of year old clay! These should be dry overnight in cool air-conditioning for coloring tomorrow.
 
Decided to try the clay release master from Tamiya on my molds - you can just use baby oil on a budget. There is no marked difference except you get a bonus facial on your fingers since you would be getting baby oil on your skin. The Tamiya version comes in a nail polish sized bottle with its own brush. One small difference was the longer time the oil stayed in the mold. With the Padico and brandless ones,  the oils dry up quickly. This retails locally for $6 a piece. If your local Tamiya supplier do not have this, visit Stargex at Paya Lebar if you're in Singapore and you should be able to find lots of products from the Tamiya Decoration Series as well as this item at the store.
 
Since my workspace has shrunk to half a table after some living arrangement changes, I have swapped to using a mini standing magnifying glass instead. But its still tiring to look at small stuff when it gets later into the night. I'm still trying to work on my scales (though most of the time, it ended up being a "feeling" thing aka it does not feel right). Maybe it's time to find a niche area that does not demand too much of scaling ._.
 

Monday, February 11, 2013

Hiatus is Over!

After a very long hiatus (lots of movement and changes in real life) I am back informally to my crafting hobby again and feeling great about it.
 
I have re-arranged a lot of materials and thrown away more sadly - since clay do dry up into unusable chunks after a whole year. But nevertheless I do have some new starting packs to work with.
Here is a sneak peek at the newly arranged craft drawers!
 

Monday, April 19, 2010

"Ikura" From Silica Gel and Coloring Resin Clay

I opened up the packet of silica gel last night and was feeling brave enough to attempt to color a batch of my own. The packet I obtained from Daiso contained mostly clear gel beads and I used a bit of Tamiya Clear X-27 Red to dye the beads. I poured enough beads to cover one layer of the small sauce cup I was using to dye them and enough paint to just stain a thin layer of the bottom of the cup.

Didn't take any process photos since I was expecting a failure since the paint or the beads may clump or just chip off or it might not stick properly to the gel beads.

I was unexpectedly treated to a surprise after the beads dried.


The gel beads are not all same in size so some are very very tiny, like microbeads, which others are large. I left the clumped beads to dry on their own and then ''unclumped'' these by pressing them between my fingertips. Three to four of the beads broke on impact in fact -- maybe there was some strange reaction between the paint and the beads (I have no idea...) But most of them were nicely and evenly colored. ^^

The other thing I accomplished tonight was to try out a couple of new paint mediums on Grace Clay. Unexpectedly, a few small drops to and fro was able to make these tiny lumps of clay achieve a brilliant and deep, or a light and delicate color. (No - they aren't expensive paints!) I made mostly fruit colored lumps for use in the danishes later.


Wish I had made rainbow colours indeed -- but I will have kind of no use for the blues eh ^^;

Sunday, April 18, 2010

Inspiration Danishes

After an onslaught of danishes by Snowfern, I was inspired to make a load of my own and some other sweet pastries too. These were molded from a couple of 1:6 pastry master molds made with Alley Goop. (I used Re-Ment miniatures to make the base and further modified it since most of the Re-Ment pastries have fruit or frosting on them) It was the first time I am using Alley Goop and I must say - this stuff works much better than the purple x white molding material I got from a Japan-based hobby shop.


The usual round danishes, bear claws, beignets (not exactly a danish but they are good!) and cinnamon swirls. (the clay is air-dry clay, a combination of 2/3 Hearty Soft White and 1/3 Grace Clay. I have used a mixture of ochre and naple yellow watercolors and FolkArt ButterCup Acrylic Paint)


Pastry with a latticed top


Danish Twists.

These would probably be great with any 1:6 scale dolls - probably the child BJDs or end up as mini-pastries if you are using these for a 1:4 or 1:3 doll. I'll get these painted tomorrow after they have dried and shrunk - these things need at least 24 hours of drying before I paint on them!

Wednesday, April 14, 2010

A Bountiful April! Utensils and Molds!

Being caught up with RL work, I've put aside miniature making for almost a month as I am simply too tired everyday to try to craft something! But then again, I have not stopped thinking about what projects to create next and have been crawling *evil laugh* about the Net in search of better resources to enhance my hobby experience. At this moment, I must really thank the presence of deputy sellers - and if not for them, I would not have collected so many wonderful tools from all over the world.

A lot of babies came in the mail this week and one of the most precious sets is this set of 1:12 bowl/plate/cups molds that I got off Taiwan's Ruten; a online shops collaboration between PCHome and Ebay. The original maker of these molds can be found here - Bruce Models (his/her website is in Mandarin, you may need a translation program if you do not understand the language)


The molds are around NT295 each (USD 9)and every single one of them is beautifully made. No air bubbles, all the edges are well-defined and the whole thing is perfectly compact. Each mold is individually wrapped and comes with its own instructions in Mandarin. The deep-dish mold comes with its own tiny wooden tool to create indentions. A set of 4 pearls (different sizes!) also comes with the bowl mold and he/she teaches you to make your own ball tools using the pearls and bamboo sticks on the website.


My grubby fingers holding up one of the molds!

Next, I'd like to introduce a certain miniature wholesaler from Hong Kong by the name of Yee Long Pte Ltd. You may or may not have seen / heard of them -- but their products would be something commonly found in many other second-tier sellers or distributors. Their prices are a little steep but for some of the rare items they offer, I am certainly bought over. If you are interested in buying from them, please check the FAQ on their website -- they have a minimum purchase amount.
Some of the 1:12 miniature utensils I bought from Yee Long :

From left to right - oval dishes for dorias and gratins, 4 sets of cutlery, plain tray and partition tray, and black cup and saucer set, with plate.
A lot more other tools came in the post too - including a very neat doll-hair maker tool, perfect to squeezing out miniature spaghetti or ramen, a bottled set of Japanese craft resin and bundles of Farinetta. <3 Deputy Sellers!

Sunday, March 21, 2010

Papercraft Patisserie Cafe Work in Progress

The paper doll-house dioramas from Sanwa Paper Co. caught my eye a long time ago but I just did not conjure up enough patience to sit down and in fact work my way through 14 pages of printed templates to get one done. But I managed to finish half of the patisserie cafe set today.

In the process of attaching the base to the walls. I used tacky glue for the base and realized that was a bad mistake. Because tacky glue is extremely "wet" and takes time to dry. It puckered up the paper and gave it soggy spots.

The rest of the cafe was attached using Beacon's fast-grab glue so no more soggy spots there-after.


Putting the inner cupboard together with glue. This cupboard is a lot of cutting work - especially the curved edges.


The assortment of tools used in this venture - craft knife, pen knife, tweezers, two sets of rulers and a scorer. The basic scrapbooking equipment. :)


Here's a half-completed set-up. There's still more miniature folding to go. But as you can see, the papers that I have used are very strong and it holds up all that ceramic plates and glass, along with the miniature air-dry clay food. More cutting and folding tomorrow!

Friday, March 19, 2010

Miniature Wagashi Box

I started on the miniature Japanese sweets or wagashi (和菓子) box project last night. The designs are made from traditional wafuu (和風) designs, which are usually of Japanese flowers like the sakura or chrysanthemum, or patterns like arrows and waves.

The box looks easy to fold at first -- even with a modified template but when it comes to cutting through the nooks and corners to make the double-folded sides, I thought I was going to be blind! :)


The purple set is the first finished box. On it are the words - 如月彩さくらもち (Febraury Colours Sakura-mochi) Patterns are all modifed and printed using CS Photoshop. I didn't make any process pictures as I was just too eager to get the box done. Maybe I'll do a process set for the next box in magenta (you can see the templates in the background.)


I think the box is around 2.5cm by 1.5cm for the inner box. Approximately a 1:12 wagashi box.


Filled it up with some of the candied fruit I made a few days ago. I think this definitely needs very tiny wagashi to be placed in it.


I will probably be making more of these boxes with different designs next week. And maybe some little wagashi to place inside.

Wednesday, March 17, 2010

Misu Donuts and Strawberry Blonde Hair

Completed the Misu Donuts (fun parody of Mister Donut) project with just a box to fold and some more paper bags to go. These are roughly 1:4 size donuts but I seemed to have gotten the scale of the folded bags wrong -- but anyway, that can be easily corrected.


Here's some more on the tray with a penny for scale.


Julia dons strawberry blonde wavelets today and appears to be waiting for someone to share her Misu Donuts with!

Monday, March 15, 2010

Vacation Projects. Time Check. Hobby Check

After working hard for two weeks, I finally get a breather! A week of rest - or rather indirect rest (Since I will still have to be finishing up a lot of administration on the side.) Over the past month, I have been making a lot of little parts and wondering how in the world am I going to make use of them -- I suppose they will all be turned into board-magnets and scrapbook embellishments since most of them are ranging between a scale of 1:6 to 1:4.

It's been roughly 3 months since I started working on clay miniatures. The returns have so far been fulfiling. I feel like my time is better abused, I have made a few more friends and I have got myself some pretty resin (aka Miss Julia) to indulge in.
I am hoping to finish up these old fashioned donuts today, along with the cruellers and twisted churro rolls in 1:4 scale and make some paper bags for them.


The other project this week is the CBC Challenge : Waffles. Here's a start-stack that I need to work on. Probably I will be adding some Belgian waffles to the mix.


Little Note :
I have cleared up the materials I bought to start on sewing doll clothing and other accessories for my resin indulgence. They are all snug in my bedroom's shelves now, away from the strong-smelling paints and varnishes are stored in my study (where I work on my miniatures). Miss Julia looks extremely tired after helping to clear away the fabrics for her new dresses and she has plopped onto her armchair with some green tea to relax. I doubt I will be writing about doll matters and sewing forays in this blog. There would most likely be a new one up once I get to it.

Saturday, March 6, 2010

Miniature Boxes, Again!

While still in the craze of making miniature boxes -- I found some more templates through Google Japan and the daunting Japanese blog ranking sites and with a few apt keywords. Today's boxes includes : a cake-box with curved handles and a see-through window, and a tray for you to put your cake on, a roll-cake box, an old-fashioned cookie box with a paper liner and  my familiar upright cake-box with a new design.


I caved in and bought myself a proper cutting mat with self-healing properties from Spotlight instead of using the tattered $2 one that I gotten from Daiso. Cheap things don't last I guess. :( The usual tools I use are the same : two craft-knifes with different edged blades, a school penknife, a metal rule, flat and sharp tweezers and manicure scissors.

I have included two more new tools to my miniature box repetoire as well : a wood carving flat-edge and a scrapbooking flattener. The wood carving tool (get one with a flat or slightly slanted edge) is used to mark and score the folds on the boxes, making folding a *lot* more easier. The scrapbooking flattener does as it says -- flatten folds.

Instead of tacky glue, this round I used Beacon's 3 in 1 Advanced Craft Glue. It is, according to its label - fast-dry, instant grab and dries clear. It is great for grabbing those small slips and corners of your boxes and getting them to stick together within a second. The only tacky part (forgive the pun) about this glue is that it is fast-dry and once it goes into drying, the glue stretches into thin strands much like super-glue. At times, because of pressure, the glue may rise upwards to the opening and "bubbles" over.

Which makes it very irritating to handle. The trick I used with this glue was to make a very tiny hole for its opening and capping it away when I put it down -- so you don't get strands or bubbles.

So here we go: the three boxes made today - and I placed some of the miniature choux cremes and swan cream puffs on the cake box's pull-out tray. The blue box in the second photograph was made a few days ago -- its a very simplistic folded box with a napkin liner. I filled it with some cookies that were made for the February project. A US penny is placed for scale.


Saturday, February 27, 2010

Cream Clay Piping Practice and Icing Tips

Did a little piping practice today. I had failed a lot previously with piping when I was using plastic nozzles. I wasn't very good either with the sillicon deco tube either -- plastic nozzles were hard to handle. With that in mind, I headed off to our local baking supplies shop and grabbed the tiniest Wilton icing tips available, which are coincidentally metal.

Miniature piping bags can be hand-made using small plastic sachets and curling a stretch of "foil teeth" from a aluminium foil or plastic wrap box. Yoyo Studio's tutorial is one of the more well-known ones to teach clay cream piping.

The difference between hand-made nozzles for miniatures and icing tips is simply -- clay wastage. Icing tips are larger and you will have a bit of clay left over after finishing whatever you have in the bag. For the miniature foil nozzles, you reduce on clay wastage.

If you aren't that nit-picky on the clay and if you're fat-fingered like I am who can't curl a length of foil teeth for nuts, just stock up on Wilton icing tips with the smallest number for the series.


These were done with a Wilton Open Star Tip 13 and a normal plastic piping bag which I cut into half since I didn't need such a big bag. Make sure you tape the plastic bag to your icing tip as it can move and mess up your piping.  You probably can get a vague idea of the tip-size with this link. I used pure Grace Soft White Cream Clay. If you are not sure how to handle a piping-bag, Google turns up a few good tutorials like 1M Swirl Cupcake Icing tutorial one on Wilton's own site.

You can also make a soft cream-like clay that can be piped easily by soaking pieces of air-dry clay in water along with talcum powder. Use enough water to soften the clay to a mushy texture but don't over-soak it else you will take a very long time to get it back to a drier state. Use acrylic colors to mix in if you want to get an opaque feel to your prepared cream.


More pictures of what I did with the rest of the cream clay. I worked with a few methods of swirling on the cupcakes made a few days ago.


Piped some cream into a few raw-looking tartlet bases. The metal tip makes it very easy to use. If you have been attempting with plastic icing tips, the tip will not be able to 'cut' and release the clay well. The larger piping bag is easy to hold and use for people with a not too steady grip. :)

Tuesday, February 23, 2010

The Madness about the Swan Cream Puff

I joined in Snowfern and Asuka's madness with the swan cream puffs and tried to make my own. Everything was quite simple to do and fix until it came to (1) coloring and (2) making the heads of the swans.

(1) being that my cream puff bases kept falling into the coloring pit of horror and I ended up with a few that can't be used. :(

(2) the heads are really tough to make! I think my fingers were sprained by the time I was trying to twist the heads into an S-shape. Finally I gave up and just made a C. So the swans look like ducks instead of swans. :o

Anyway :


Puff-bases from vanilla-based air dry clay. This is pure Grace clay. I simply refuse to use Hearty-Soft since it does not agree with the molds I use. This time, instead of the usual opaque acrylics I use, I colored using a mixture of water varnish for wood surfaces and Tamiya clear acrylics.


They look a little like Japanese soy-sauce crackers on second look - but I am still pleased with the results. These are not varnished yet, so after varnishing, they would be less soy-sauce shiny? :0


Finally got these three assembled after like 30 minutes of struggling with the cream and wings. I had to glue the wings of the smallest one to the cream, else it kept falling off. Then I realized I have a lot more swans to assemble... so I think I'll leave those to tomorrow.


View from the top - the larger swan on the blue plate appears to have an elongated cream butt-tail, now that I look closer at it.

My largest swan - you can see the 'C' neck instead of the 'S' neck.


With a penny for scale for you to gauge the size of these three. :)

And finally, my messy work-top with lots more puffs to assemble.


Till the next crazy CBC challenge! Onwards, girls!

PS: Have a look at Asuka's and Snowfern's swans at their blogs.